Connect a Non-school Based/ Third Party Custom Domain (URL) to Your OpenScholar Site

What is a "Non-school Based/ Third Party" domain name?

Domain hosting companies like GoDaddy or Blue Host will sell you a custom domain of your choosing for a reoccuring fee. When/if engaging with these providers you only need "domain hosting" NOT "web hosting". If you are using OpenScholar, your school or organization is hosting your site through the OpenScholar Company and "web hosting" isn't needed.

Example Non-school Based/ Third Party domains:

mylabname.com
initiativexyz.org
myeventname.com

* Please note that your school or organization may have restrictions on applying non-school/organization domains to OpenScholar sites. Please check with your school's IT Department prior to starting this process.

Connecting the domain name to your OpenScholar website

To connect your non-school Based/ third party custom domain to your OpenScholar site, follow the steps below:

  1. Go to your domain host's DNS settings and add 2 new individual A Records pointing to the following IP addresses: 18.208.82.203 & 18.232.209.104
    1. Remove all other A Records only. DO NOT remove other record types (like MX Records)
  2. If you are using a www record as well, set it up this way:
    Create a CNAME for www.example.edu that points to https://example.edu.
  3. Contact the OpenScholar support team and provide your custom domain and alert them that you have added the 2 new A Records & IP addresses and request that they connect your custom domain to your OpenScholar site (provide your OpenScholar website url).
     
  4. Upon approval, the OpenScholar team will add your custom domain to your site

If you need help adding A Records, please refer to the information below.

Updated:  17 Sep 2021

Connecting a Custom Domain From Popular Domain Hosts

Step 1: Go to the DNS Manager

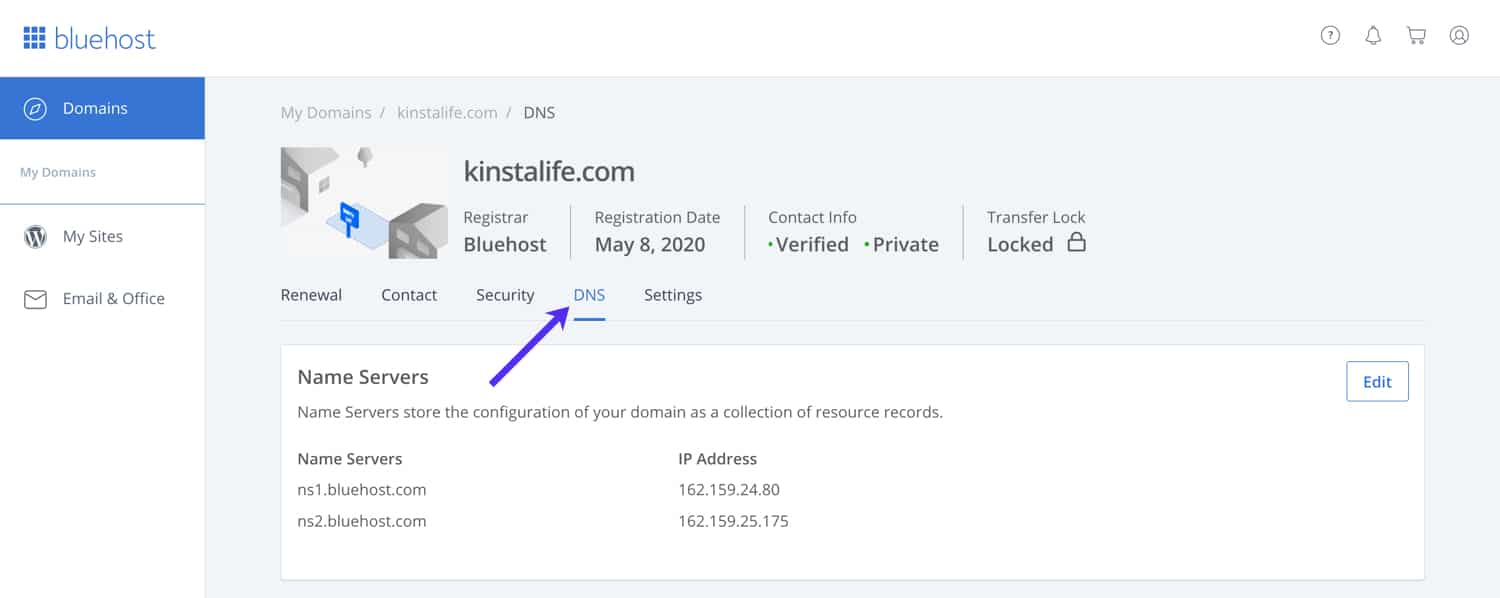
To get started go to the “Domains” page in your Bluehost dashboard, and click on the Manage button next to the domain you want to add an A record for.

--Click on your domain in Bluehost.

Next click on the DNS tab to go to the DNS management interface.

--Go to the DNS management page in your Bluehost dashboard.

Step 2: Add an A Record to Bluehost

Next, you’ll need to configure the host record, destination (points to), and TTL for your Bluehost A record.

Host Record

If you are configuring an A record for your root domain (e.g. kinstalife.com), use “@” for the “Host Record” field in Bluehost’s DNS manager. If you are setting up an A record for a subdomain (e.g. awesome.kinstalife.com), use the subdomain for the host record.

Points To

In the “Points To” field, paste your Kinsta site IP address. If you’re not setting up an A record for your Kinsta site, use the IP address of your server instead.

TTL (Time to Live)

Leave the TTL setting at the default minimum duration of 4 hours.

--Finalize your Bluehost A record

Finally, click Save to finalize the configuration. After your Bluehost A record has been created, it may take up to 24-48 hours for it to propagate around the world

Adopted from https://kinsta.com/knowledgebase/bluehost-a-record-cname/

  1. Click the DNS link located under your domain on the Manage Domains page.
     
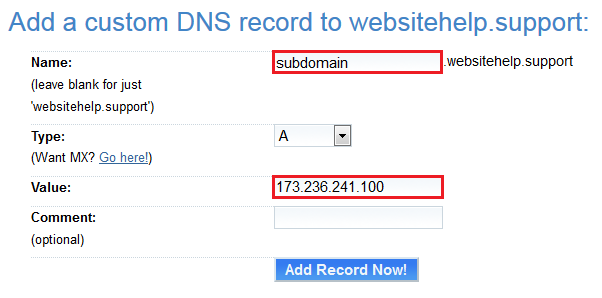
  2. Enter the following in three fields to create the A record:
    • Name: For the main domain, leave the ‘Name’ field blank. For ‘www’ or other subdomains, you can enter the subdomain name in this field.
    This field is often any of the following: www, blog, dev, store, and so on.
    • Type: The record ‘Type’ defaults to ‘A’.
    • Value: Enter the IP address in the ‘Value’ field.
    This is the IP address you want this domain/subdomain to point to.
  3. Click the Add Record Now! button.

The propagation for the new A record begins, and can take up to 6 hours before the new records update online.

Reference: https://help.dreamhost.com/hc/en-us/articles/215414867-How-do-I-add-custom-DNS-records- 

The steps to add an A record to your DNS zone file in your GoDaddy account can be found here

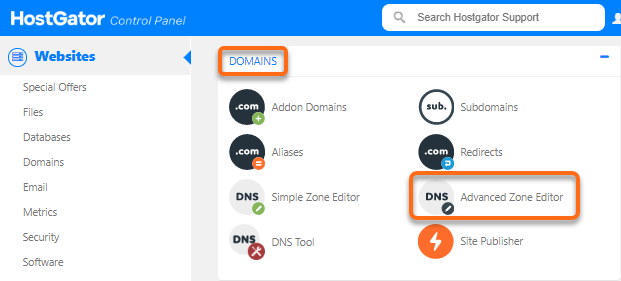
  1. Log in to cPanel.
  2. In the Domains section, click Advanced DNS Zone Editor.


  3. Select the domain from the dropdown menu that you wish to use
  4. Go to the Add a Record section.
  5. Provide the name for the A Record, TTL, and add the IP Address.
  6. Click Add Record
    .


    Reference : https://www.hostgator.com/help/article/how-to-change-dns-zones-mx-cname-and-a-records#arecord

 Steps on how to create an A or CNAME record can be found here, https://support.google.com/domains/answer/9211383?hl=en